You spent an hour carefully pressing strips of washi tape onto your wall. You stepped back, excited. And then… it just looked a little off. A little craft-fair. A little like something you’d see in a college dorm and quietly cringe at.
Sound familiar? You’re not alone. Washi tape wall art has been all over Pinterest for years, but there’s a real gap between the inspiration photos and what most of us actually end up with.
The good news? The fix is not complicated. It’s almost always one of a handful of common mistakes and once you know what they are, you can turn your walls from “meh” to genuinely impressive.
Whether you’re decorating a rental apartment, refreshing a beige feature wall, or just looking for cheap apartment wall decor that looks expensive, this guide is for you. Let’s get into it.
The Real Reason Washi Tape Wall Art Looks Cheap

Before we get to the fixes, let’s talk about why this happens in the first place.
The most common culprit is tape that’s too thin, too busy, or applied without a plan. Washi tape is beautiful, it comes in hundreds of colors and patterns but that variety is also what trips most people up.
When you pick tape based on what looks cute in the store rather than what works on your specific wall, you end up with something that feels scattered and unintentional.
Another big issue is scale. A tiny geometric design in the corner of a large wall doesn’t read as art, it just looks like you started something and gave up.
Washi tape wall decor needs to be big enough to anchor the space, or deliberately minimal enough to feel like a choice.
And then there’s the application itself. Crooked lines, uneven spacing, bubbles, or tape that’s starting to peel at the edges? All of these say “craft project” instead of “intentional design.”
How to Make Washi Tape Wall Art Look Good: Start With a Plan

The single biggest upgrade you can make to your washi tape wall art has nothing to do with the tape itself. It’s the planning stage.
Before you stick a single piece of tape to your wall, sketch out your design on paper. Or use painter’s tape as a rough placeholder first.
This lets you visualize the scale, spacing, and overall feel without committing to anything. It sounds like an extra step, but it saves you from that sinking feeling when you realize your chevron pattern is three inches off-center.
Use a Level and Measuring Tape – Every Single Time
This is the tip that separates washi tape wall art that looks elevated from the kind that looks rushed. Our eyes are surprisingly good at detecting when something is even slightly off-level. A line that’s tilted by just two degrees will bother everyone who looks at it – even if they can’t quite name why.
Grab a small level from the hardware store (they’re under $10), measure your spacing with a tape measure, and mark your guidelines lightly in pencil. Yes, it takes longer. Yes, it’s 100% worth it.
Choosing the Right Tape for Washi Tape Wall Decor That Looks Expensive

Not all washi tape is created equal, and the tape you choose will make or break the final look.
Go Thicker Than You Think You Need
Thin tape (6mm or less) almost always looks fussy and delicate on a wall. It gets lost. Go for 15mm or wider for your main design elements. If you’re doing washi tape geometric patterns or large accent lines, a 25mm tape can look genuinely bold and architectural.
The wider the tape, the more confident and intentional the design looks. It reads as art, not fiddly craft.
Stick to a Tight Color Palette
One of the fastest ways to make your washi tape wall art ideas look polished is to limit your palette. Pick two or three colors that complement each other and stick to them.
Solid, matte tapes in neutral or earthy tones – think warm whites, dusty terracotta, sage green, or charcoal – tend to look the most sophisticated.
Save the rainbow patterns for a kid’s room or an accent piece. For a living room or bedroom, restraint is your best friend.
Washi Tape Wall Art Ideas That Actually Work in Real Apartments
Okay, let’s get into the actual ideas. These are washi tape wall ideas that look expensive because they’re rooted in basic design principles – symmetry, scale, and intentional negative space.
The Washi Tape Accent Wall

A washi tape accent wall is one of the most impactful things you can do in a rental. Instead of random scattered elements, you’re treating the entire wall as a canvas.
A popular approach is vertical stripes – evenly spaced, floor-to-ceiling lines in two alternating tones. This draws the eye upward and makes the room feel taller.
Use a 15mm or 25mm solid tape in a warm neutral (cream and tan works beautifully on beige rental walls), measure every line carefully, and the effect is genuinely striking.
This is one of the best renter beige wall ideas out there because it works with the wall color rather than fighting it.
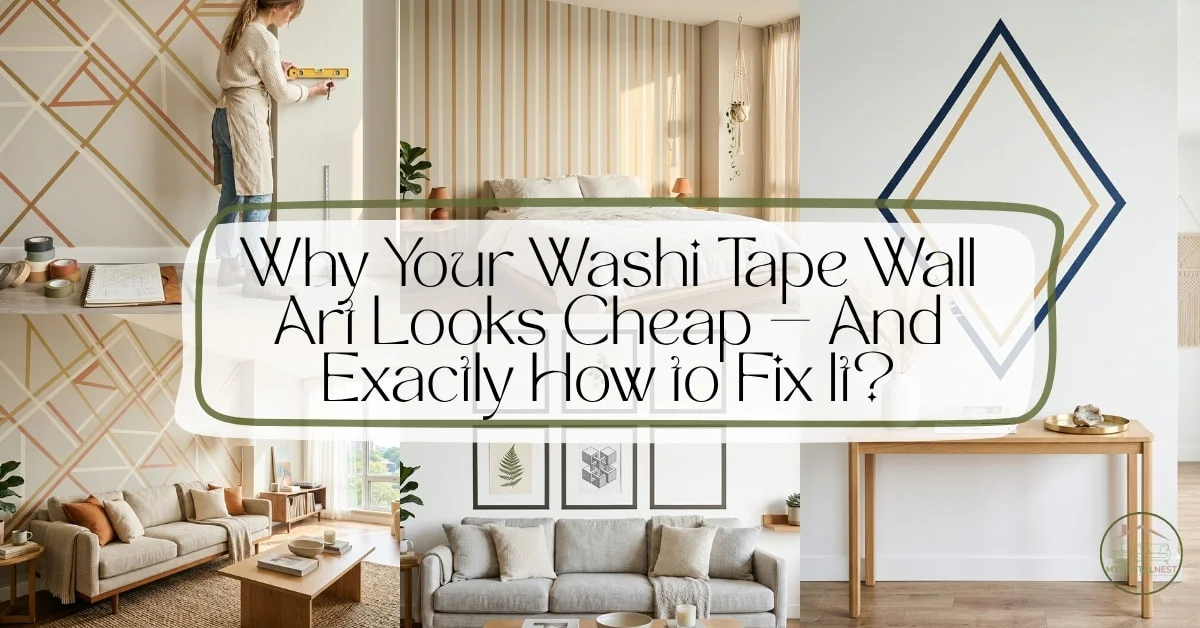
Washi Tape Geometric Wall Art

Washi tape geometric wall art is having a serious moment, and it’s not hard to see why. Clean triangles, hexagons, or abstract angular shapes look architectural and modern like something you’d find in a boutique hotel.
The key is keeping the geometry large and the design simple. One oversized diamond shape in the center of a wall, outlined in a single color of tape, looks infinitely more intentional than a dozen small scattered triangles. Go big, go simple.
For a more layered look, try washi tape geometric patterns in two complementary colors – like deep navy and warm gold – using one color for the outer frame and one for a subtle inner line.
Washi Tape Picture Frames on Wall
This is one of the most underrated washi tape wall art DIY ideas. Instead of hanging actual frames (which requires nails and patches when you move out), you create the look of framed art using tape alone.
Use a thick, solid-color tape to outline rectangular “frames” on your wall in a symmetrical grid – maybe three across, two rows deep.
Inside each frame, you can leave the wall bare (letting the texture and color shine), pin a small print, or add a single botanical illustration.
The result looks like a washi tape gallery wall but with a cleaner, more architectural feel. It’s one of those no-nail wall art ideas that genuinely fools people into thinking you’ve invested more than you have.
The Washi Tape Gallery Wall

A washi tape gallery wall works when you treat it like a real gallery wall with intentional spacing, consistent framing, and a cohesive theme.
Mix tape-outlined frames with actual small prints or photos, keeping everything within a defined rectangular zone on the wall. Don’t let it sprawl. The boundaries you set are what make it look curated rather than cluttered.
Also Check: Gallery Wall Without Nails: A Step-by-Step Guide for Renters
Washi Tape Wall Art for Renters: Deposit-Safe Decor Done Right
One of the biggest selling points of washi tape wall art for renters is that it’s technically removable. But ‘technically’ is doing a lot of work in that sentence. Done wrong, tape can still leave residue, peel paint, or damage textured walls.
Here’s how to make sure your washi tape wall art no damage promise actually holds up.
Test First, Always
Before going full design mode, stick a small piece of tape in an inconspicuous spot behind a door or in a corner and leave it for a week.
Then remove it slowly. If the paint comes with it or leaves residue, try a different brand of tape or a different wall location.
High-quality washi tape brands (like MT Tape or Masking Tape) tend to leave cleaner removals than cheap craft-store alternatives. It’s worth the small price difference for true deposit-safe wall decor.
Don’t Leave It Up for Years
Washi tape is a temporary wall art idea – and it really should stay temporary. The longer it sits, the more the adhesive bonds with the paint.
Most designs should be refreshed or removed within six to twelve months to ensure a clean removal.
Think of it as a seasonal update rather than a permanent installation. This actually works in your favor you can refresh your washi tape wall ideas apartment-wide with the seasons or whenever you want a new look.
Also Check: 8 Best Removable Wall Hooks for Damage-Free Apartment Living
DIY Apartment Wall Decor: Finishing Touches That Make the Difference

Once your washi tape wall art DIY project is up, a few finishing moves can take it from “I did this myself” to “wait, did you hire someone?”
Layer With Other Renter Friendly Wall Art Ideas
Washi tape wall art doesn’t have to stand alone. Pair your design with a floating shelf, a macramé hanging, or a mirror that echoes the shape you’ve created with tape.
These layers make the space feel intentional and lived-in, not like a single craft project on an otherwise bare wall.
The combination of removable wall art apartment-friendly elements tape, removable hooks, peel-and-stick shelves is the holy trinity of renter decorating.
Match Your Tape to Your Room’s Existing Palette
This sounds basic, but it’s where most temporary wall art ideas fall apart. If your room has warm wood tones and cream textiles, choose tape in warm, earthy colors.
If your space is cool and minimalist, crisp white or charcoal tape will feel much more at home.
The goal is for the washi tape wall art to look like it belongs – like you chose this on purpose because it works with everything else in the room.
Light Your Wall Art
This is the secret weapon of DIY apartment wall decor. A small picture light, a wall sconce, or even a plug-in LED strip pointed at your design transforms it completely. Shadows from a geometric tape pattern at night can look genuinely artistic.
You don’t need expensive lighting. A $20 clip lamp aimed at your washi tape accent wall can make it look like a gallery installation.
Final Thoughts: Cheap Apartment Wall Decor That Looks Expensive Is All About Intention
Here’s the thing about washi tape wall art – it’s not inherently cheap-looking. It’s incredibly versatile, budget-friendly, and one of the best tools in the renter’s decorating toolkit.
What makes it look cheap is the lack of planning, the wrong tape, or the wrong scale.
Fix those three things, and you’ll have wall decor that genuinely impresses guests and makes your rented space feel like yours.
Start small if you need to – a single tape-framed section above your bed or desk. Get comfortable with the measuring and application process. Then scale up to bigger washi tape wall art ideas as your confidence grows.
The walls in your rental deserve more than bare beige. And you deserve a space that feels like home without risking your security deposit to get there.
Happy decorating.